
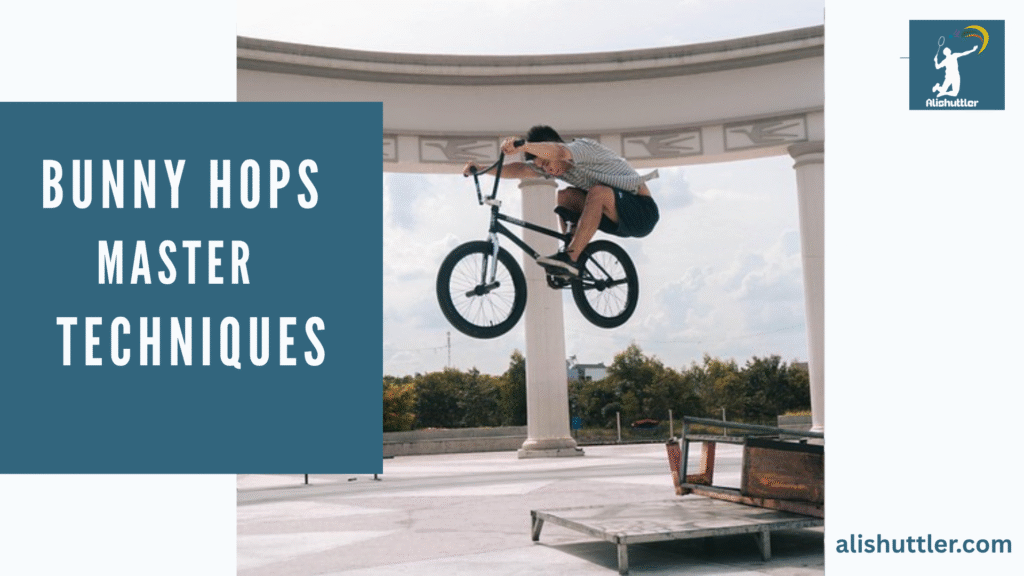
Bunny hops, on a bike, are when both wheels come off the ground at the same time, by first lifting the front, then the back. Bunny hops allow you to clear small gaps, curbs, or roots on many bike trails.
Riders employ this ability for increased control and to maintain velocity in bumpy terrain. Bunny hop steps are easy but require some practice. The following sections detail each step to get you started.
Foundational Physics
A bunny hop combines the magic trio of physics, balance, energy, and motion. Each one works in conjunction to assist you in popping up both wheels and gap obstacles with pinpoint accuracy. The American Bunny Hop, a two-step approach, is the most efficient globally. Things like rider height, bike fit, and equipment all characterize your capacity to hop fluidly.
| Physics Concept | What It Means | Bunny Hop Example | Why It Matters |
|---|---|---|---|
| Center of Mass | Where weight sits | Hips above pedals | Better balance |
| Energy Loading | Storing power | Compression before jump | Higher hop |
| Force Transfer | Moving weight | Shifting back then up | More lift |
| Momentum | Carrying speed | Hopping while rolling | Clearing obstacles |
| Leverage | Using body/bike | Tall riders, big wheels | Mechanical advantage |
Body Position
A neutral riding stance keeps your body balanced and allows you to respond quickly. Keeping loose in your arms and legs, elbows bent and knees soft, means you can flow with the bike, not fight it. This is crucial for maintaining stability as you initiate the hop.
Put your hips over the pedals– this is where your center of mass remains most manageable. Looking forward, not down, gives you a sense of what’s before you and helps you maintain your balance. This posture rocks whether you short or long ride, and is a must for all skill levels.
Weight Transfer
A slick hop begins with a weight transfer. Lean back to squash your legs and load the spring. Then as you explode upwards, your weight rolls from your feet into the bars and back again.
Strong core muscles keep you steady, particularly at the apex of the hop. Play with your posture, leaning your weight in small ways to see how it affects your balance and height. Just as every bike/rider may require a different combination, discovering your sweet spot requires trial.
Energy Loading
Imagine your body as a spring. Prior to the hop, crouch and compress—this stores energy in your legs and arms. When you push up, all that energy goes into the bike and catapults you over the obstacle.
It begins by compressing down, then snapping up fast. Sync this to the bike’s movement – particularly on larger diameter wheels or longer bikes. Imagine the energy radiating from your body into the frame.
Clipless pedals assist for some, enabling the rear wheel easier to pop up, but a solid manual remains the foundation.
Essential Preparation
Bunny hopping requires skill and the proper configuration. Some cautious pre-practice steps keep things secure and assist you to absorb quicker. These fundamentals count for every level of ability.
For a quick overview, the gear you need includes:
- Helmet (fits well, not loose)
- Knee pads
- Elbow pads
- Gloves
- Clothes that stretch and breathe
Safety Gear
Donning the proper equipment is not merely a rookie advice. Helmets provide actual protection and should fit your head snug, with straps tight but not choking. Knee and elbow pads assist in preventing scrapes or bruises if you take a tumble – something that occurs frequently when trying new moves.
Gloves steady your grip, particularly if your hands become sweaty or the weather shifts. Choose clothing that doesn’t constrict or rub, and be certain you can move your limbs without restriction. This way, you can concentrate on the hop and not on your gear shifting around.
Bike Setup
Bike fit is critical. It should be low enough that you can flex your knees and jump up quickly, but not so low you lose leg strength. With adequately inflated tires (check the side of your tire for numbers, usually somewhere around 2.0–2.5 bar), your bike clings to the earth more tightly on hops and landings.
Brakes gotta be sharp, test ’em, they stop you quick and smooth. Lighter bikes feel easier to lift some riders replace heavy pedals or wheels with light ones if they want to level up. Right bike size and good geometry help keep your weight centered, so your bunny hops are stable and smooth.
Practice Area
A nice location is nice and level, open and clear of cars, people or random stuff that might cause you to stumble. Basketball courts, empty parking lots or quiet trails fit the bill.
When you have the fundamentals down, little curbs or bumps are great for testing your techniques, but don’t hurry. Ensure the ground isn’t too slick or loose—grip counts on takeoff and landing. Use chalk or small cones to designate where you begin and end, so you have your boundaries and can measure your advancement.
Goal Setting
Make your goals measurable. Begin by popping up your front wheel, then the rear, prior to attempting the complete bunny hop. Work on sinking your weight and bending your knees and elbows slightly to prepare for each hop.
Ace the pumped manual and each of the wheel lifts individually. Just give it two good pedal cranks to get goin’—not too fast, not too slow. Practice until both moves feel natural, and don’t rush learning. Soft touch downs take time.
The Bunny Hop
The bunny hop is a technique that allows you to get both wheels of your bike off the ground in unison, assisting you in clearing minor impediments without dismounting. By breaking it down into smaller steps, it becomes much easier to learn, both for adults and for young riders.
By working a different part of your body/bike, each snippet of the hop should be practiced individually before attempting the full thing.
1. The L-Shape
Begin by setting yourself up in an “L” position with your body and bike. Bend your knees and elbows to reduce your center of gravity. It keeps you centered and prepared to hop up.
It’s the L-shape where the majority of power for a bunny hop originates. Hang for a second or two before lifting up, concentrating on a straight back and weight centred between the wheels.
As stated, the L-shape gets you the correct body angle for a powerful hop. Imagining this form keeps you repeating the correct mechanics in practice.
2. The Front Lift
Pull up on the bars to elevate the front wheel. At the same time, lean back a bit, but don’t stand up too straight or you’ll fall over. Your weight remains over the bike, not behind it.
This is a lot like the beginning of an air pumped manual, where you pull up on the handle bars to direct the front wheel upward. When you initially experiment with this, proceed slowly and try it frequently.
With practice, you’ll sense when the front wheel is light and ready to lift. Practice this section a few times by itself before proceeding to the next.
3. The Rear Scoop
After you’ve got the front wheel up, begin to lift the back. Allow your feet to scoop back like shifting gears with your shoes–this assists in getting that rear wheel airborne.
Stroke your legs to push the bike up, maintaining a fluid cadence with the front lift. Meanwhile, attempt to maintain a tight core and, most importantly, gaze forward, not down!
The timing of lifting the front and scooping the back is key. Others swear by clipless pedals to make the rear scoop easier, but working on flat pedals can help condition good habits.
If you ride a lighter or smaller bike, mastering this step will be less fatiguing.
4. The Tuck
Pull your knees up to your chest and tuck your elbows in as soon as both wheels are airborne. This grounds your hop and helps you gain air.
The tuck allows for better control in the air. A few riders see a tight tuck at the table as landing drug into a smooth place and easy to manage.
Work on your tuck by bunny hopping over little sticks or marks on the dirt. Every time, attempt to curl your body into as small a ball as possible.
5. The Landing
Try to get the front wheel down first, then drag the rear. Push down with your arms to cushion the blow. Use your knees and elbows to absorb any bumps from the landing.
Be loose on the bike with your weight in the middle. Land rear wheel first if you crave more control, particularly immediately after landing.
This will assist you in maintaining your line and gliding off.
Common Mistakes
A lot of riders make the same errors when learning to bunny hop. Bad timing, rigid motion, and lack of weight control can all constrain. The mistakes below can help you spot trouble and fine-tune your approach:
- Lifting the bike too early, before full compression
- Relying only on the arms to pull up
- Locking joints or standing up too straight
- Landing rear wheel first, not both wheels together
- Poor use of legs to absorb the bike
- Not synchronizing the front and rear wheel movement
- Failing to scoop pedals with the feet
- Not practicing the pumped manual in isolation
- Loosing balance by lifting rear wheel too high or too soon.
The English Hop
A lot of riders initiate the hop prior to fully compressing themselves and the bike. This makes it difficult to achieve optimal height and can disrupt your balance. Instead, concentrate on driving down, squashing the suspension and tires, and only THEN springing up.
Jumping the gun here tends to have the back wheel scuffing, or the hop out of control. If you’re uncertain if you’re lifting too early, attempt to decompose the move. Crouch all the way down, pause a moment, then pop up as high as you can.
Slow motion videos of your hops can assist. Major indications of early lift are not getting both wheels up to the same height or feeling hurried. Working on the pumped manual by itself can cultivate this timing for a smoother, more efficient bunny hop.
Pulling Up
A typical mistake is assume the arms do all the work. Pulling hard on the handlebars alone rarely gets you a clean hop. It should be movement of the whole body. When you couple pulling with pushing through the feet and knees, the bike follows more naturally.
Use your legs and core to scoop the pedals and absorb the bike. It helps level both wheels mid-air and balance the landing. A rider that neglects the leg pump is likely to struggle to pop that back wheel up, resulting in either rear wheel first landings or spin outs.
Working the ‘scoop’ as a drill can develop muscle memory and confidence.
Poor Timing
Timing governs the rhythm of the bunny hop. If you hurry or lag any piece, the wheels may not lift off simultaneously, leading to a wobbly or clumsy bunny-hop. Many riders plant rear wheel first, particularly on flat ground, because they have bad timing of the front and rear wheel movements.
Compression/lift drill: Capture your hops with your phone or camera. Watching playback, you can see if you’re jumping too soon or missing the perfect moment to scoop the back. Identify the sequence—compress, lift front, then scoop rear—and practice it until it feels intuitive.
This assists both height and control.
Stiff Body
Locking elbows or knees limits your mobility. Remember, the bunny hop is a rolling action, not a rigid leap. Keeping the body loose, with bent elbows and knees, helps with shock absorption and balance.
Too hard, and it’s difficult to ‘pull’ the bike into your body or control in the air. Keep relaxed to keep the motion slick. Warm up with some dynamic stretches to keep joints loose.
A loose body is easier to right errors and maintain equilibrium, should you arrive off-kilter. Stiffness causes overcompensation and loss of balance.
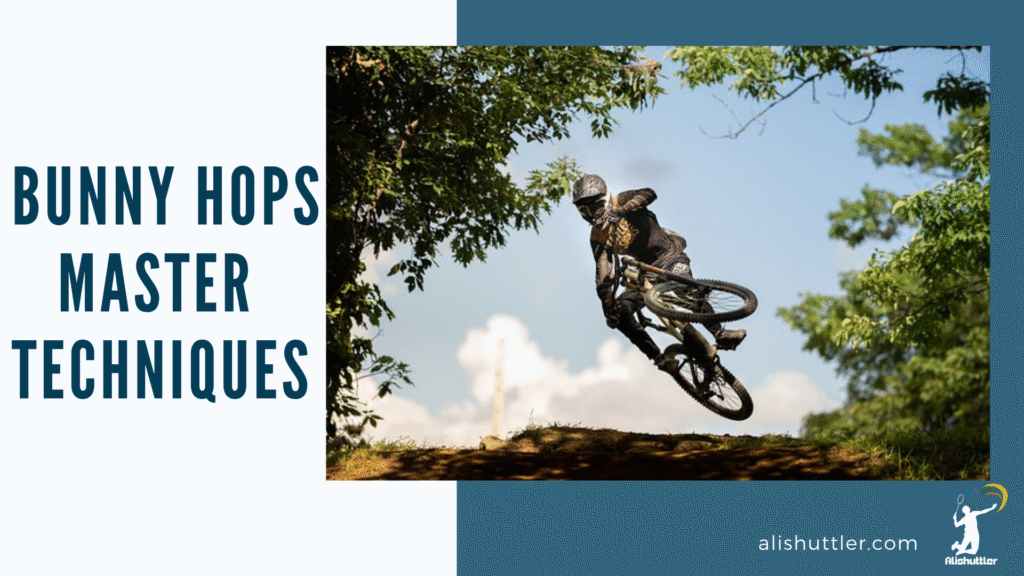
Advanced Application
Advanced bunny hopping is not just for jumping curbs or roots. It assists riders to maintain control and carry momentum on challenging trails. To adapt your riding to different terrains and obstacles is the sign of an expert mountain biker. Highly skilled riders can respond quickly, stay composed in the air, and land pristinely, even when the terrain shifts beneath their tires.
Terrain Adaptation
Use a checklist to spot surfaces to practice on: flat concrete, loose gravel, packed dirt, grass, and rocky paths. They each have their own difficulty. On slick terrain, combine form with timing. When you transition to grass or dirt, rehearse how the bike behaves when the tires lose traction or sink in.
Hopping on rocks trains you to take bumps and shift your weight quickly. Walking on irregular terrain develops your capacity to remain limber and respond to unexpected shifts.
Set your posture prior to every hop. Maintain bent knees, relaxed arms and weight control. This prepared stance allows you to manage flat and rugged terrain. Make sure to hit the ground with your front wheel first to maintain control, particularly on descents or after large jumps.
Over time, muscle memory will have you making these changes subconsciously.
Obstacle Clearing
Begin by jumping over sticks, bricks, or small logs. Keep your eye up and line it up. Timing is everything. Attempt to pull up immediately prior to the obstacle, synchronizing your hop with its height.
Don’t WHACK it with your wheels–lift the front, then the rear, all in one smooth motion. With practice, up the ante. Stack two or three or get bigger rocks. Keep your eye on landing smooth and keeping your speed.
Each new level of difficulty enhances your confidence and control.
Trick Integration
Once you feel comfortable with some regular bunny hops, throw in some tricks to up the skill factor. Experiment with a little barspin on takeoff or a tailwhip, if you’ve got room. Begin slow and introduce tricks only once you’re secure in the air.
Hold on light and gaze ahead, not down. This constant repetition teaches you how hard you can push your bike before you lose control. Combining tricks with hops keeps your riding crisp.
Adaptability
Change your speed for different terrains. Stay alert to how the bike bunny hops feels beneath you. Shift your weight as needed for bumps or slopes. Keep your eyes up and plan your moves.
Self-Coaching
Self-Coaching is the secret sauce for mastering the bunny hop alone. Follow these steps for steady progress:
- video your practice so you can analyze your form afterwards
- Set targets for each sitting for bunny hops.
- Record yourself and observe what you do well and what needs improvement.
- Sign up for online cycling groups or request feedback from your friends for fresh advice.
Video Analysis
Record and watch your own videos each time. This allows you to notice things that you could miss on the road.
See if you’re back is straight when you pop the front wheel. Are you out of time when you yank the back tire up? Attempt to mimic the shape you observe in popular tutorial videos on the web.
For instance, if your arms are too rigid relative to a tutorial, try to relax them next time. Seek out even minor improvements, such as improved foot placement or smoother landings. This allows you to identify where you’re improving and what steps require additional effort.
Focused Drills
Decompose the bunny hop. For example, practice popping the front wheel, then the back, before attempting both at the same time.
Cycle through each drill a few times until it runs smoothly. If pulling up the rear wheel is giving you trouble, attempt some step drills first, such as rolling along and lifting only the back end.
Monitoring your progress does that is, record how high you can jump in centimeters. Over time, those numbers will reflect actual growth bunny hops.
Progressive Goals
Set a low bar initially, like clearing a 10 cm curb. As you improve, aim for higher hops, 30 cm then more. Every time you hit a new level, reward yourself.
This might be as easy as recording your top hop in a log book. Make goals small and realistic. If you break through to a new high, attempt to repeat it three successive times before advancing.
Review goals every few weeks and only raise the bar when you feel ready. Slow and well is better than fast and sloppy.
Peer Feedback
Have friends observe your hops and provide candid advice.
Join biking groups online to post clips and get advice. You can leverage forums where riders exchange advice and commiserate.
Feedback from others helps you see blind spots.
Final Thoughts on Bunny Hops
Once you learn the bunny hop, new ways to ride become possible. Little curbs, gnarly roots, and gaps begin to seem less intimidating. Every element from bike check, to right stance to last-minute lift cultivates genuine technique. Riders of all animosity can follow these steps to experience distinct progress.
Errors, again, but with every attempt, it becomes more fluid and more enjoyable. Riders around the world bunny hop to ride better and safer. To keep skills fresh, check in with your own moves or ride with friends for tips. Give these steps a whirl on your next ride and watch your control and flow expand. Be inquisitive, experiment and have fun with the leap each time.
Frequently Asked Questions
What is a bunny hop in cycling?
A bunny hop is when a rider pulls both wheels off the ground simultaneously. It greatly eases clearing obstacles on the run without having to stop and dismount.
Do I need any special equipment to learn the bunny hop?
No fancy gear required. Any well-tuned bike will do. A helmet and pads are highly advised for amateurs.
Why is understanding physics important for the bunny hop?
The key is knowing a little simple physics so you can leverage your body’s momentum and balance. That knowledge is what makes the move safer and more effective.
What is the most common mistake beginners make?
Most beginners attempt to pull only with their arms. A good technique applies both bodyweight and timing to lift the bike fluidly.
How can I practice the bunny hop safely?
Begin on flat, open ground. Practice each, front and rear wheel lifts, independently before you attempt to combine the two.
Can the bunny hop be used on all types of bicycles?
Yeah, but it comes easier on superlight bikes with platform pedals. Heavy bikes or bikes with clip-in pedals might be tough.
How long does it take to master the bunny hop?
Learning times are different. With daily practice, 99% of people make progress within a couple weeks. Persistence and time are the answer.